Ease of Raising:
|
3/5
– Bi-weekly check up
|
Water:
|
4/5 – Daily (mostly during fruit set)
|
Sun:
|
5/5
– Full sun,
no shade (fruit ripening)
|
Training:
|
3/5
– Needs some,
pinching out of flowers/growth
|
Fertilise/Feeding:
|
3-4/5
– Monthly (growing) to Fortnightly (fruiting)
|
Time to Harvest:
|
3-4/5 – Moderate (2-4 months, green can be picked soon, ripe fruit
later in summer)
|
Frost Hardiness
|
1/4 – Very Tender (cannot take light frost)
|
Uses:
|
Culinary, Pollinator attractor
|
Most Problematic
Nemesis:
|
Blossom End Rot, Sunburn
|
Container Plant:
|
Preferable
|
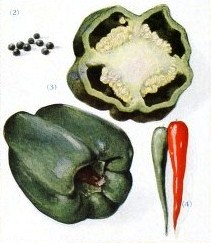 |
| Peppers Capsicum |
The word "pepper" is used to describe two different families of plants, one is used as a fruit and the other used as a spice (aka your salt & pepper J). ‘Peppers’ is the collective word for bell peppers, chilies and paprika, whereas white/black pepper describes the dried fruits from the Piper nigrum plant, which is used for seasoning of just about everything.
Here I will be focusing on Bell peppers, as I do not grow chillies – don’t like to eat them, so why grow them J - but the tips and tricks discussed here will help chilly growing as well.
History
Now then, I think the history of bell peppers and chillies is quite obvious. It originated in Central and South America (specifically the Caribbean & in Mexico) and has been cultivated since 3000BC. Columbus took these plants to Africa and Asia, where it quickly became a popular and integral part of those cultures’ dishes.
Science Stuff
The pepper genus, Capsicum, is divided into roughly 3 groups; Capsicum annuum ssp. Paprika Longum group aka Paprika, Capsicum annuum Grossum group aka sweet/bell peppers and Capsicum annuum Longum group aka chillies. Another species, Capsicum frutescens, also includes some chilly varieties, which are used to make Tabasco sauce.
.JPG) |
| Bell Pepper Plant Capsicum annuum |
The Capsicum genus, belongs to the Solanaceae family, which includes other well-known fruiting plants, such as tomato, potato, eggplant and ‘medicinal’ plants, such as tobacco, belladonna, thorn-apple and henbane. For the medicinal plants, one should remember that it is the dosage that distinguished a remedy from a poison. J
Growing Peppers
Peppers are grown as annuals, but they are perennial plants. In areas which do not experience very cold winters, the pepper plants can be left during the winter to flower and fruit early in the next spring. Colder climate areas, will grow peppers as annuals from seeds – or you could protect the peppers from harsh winter conditions by housing it indoors. I have 2 peppers plants going, one remains from the previous season (to flower and fruit early, while the other grows) and one planted newly. After fruiting, the 2nd season pepper is removed and the newly planted pepper is left to survive the winter. In this way you rotate your pepper plants, so that they do not become too old and scraggly.
Seeds are sown when the last threat of frost has passed or they can be pre-sown indoors and transplanted outside once their first ‘true leaves’ have appeared. Make a 1-2cm hole in the ground, place the seed in the hole and sprinkle soil over, this increases seedling emergence and prevents the seedling from being washed out of the soil.
2.JPG) |
| Capsicum annuum - Bell pepper Seedling |
Peppers require training, not as much as tomatoes, but a little more than eggplants J. The plants should be supported by one stake tied to the main stem. A little gap should be left between the stake and the stem when tied to prevent damaging the plant and allows the plant stem to expand.
A bell pepper plant should be allowed to carry 6 fruits at any time. So if you pick some peppers to use green, allow the plant to set more flowers until the fruit count is up to 6 again. Smaller fruiting pepper plants, such as pepper-dews and chillies, can carry a lot of fruits on one plant. Once a pepper plant has gone into their 2nd season, they have acclimated (adjusted to your weather conditions) and will fruit like crazy, especially pepper-dews and chillies – you won’t know what to do with them all! I think that you should get away easily with 12 fruits per pepper-dew/chilly, if I have to make an educated guess J.
You would think that these plants won’t require much fertilisation, as the fruits are hollow. But capsicums need a lot of potassium for fruit set, so feed them as often as you would your tomatoes. Once, while growing and every second week during fruit set.
All bell peppers have 3 stages of ripening, unripe = green, ripening = yellow/orange and ripe = red/purple. I have not been able to get peppers to ripen as soon as they have set fruit – even though the tomato is closely related, they seem to follow different ideas about when to ripen their fruit. Fruit ripening starts late summer (so this be the yellow ones J) and will be fully ripe in autumn (this be the red ones).
.JPG) |
| Bell pepper, setting fruit Capsicum annuum |
Peppers like hot weather, but can get sunburn (our African sun burn holes in the fruit! I first though it was worms, but I have never seen any worms on the plants and the hole seems ‘fallen in’ rather than ‘eaten out’ J). I am still thinking of a way to prevent this, because ‘holy’ peppers can’t be good J.
Other pepper tips
There is a huge variety of pepper colour, shapes and sizes – if you are someone who likes chillies, there is a large variety of easily accessible (you can get hold of them easily J) chillies that also vary in their ‘hot’ factor (I remember the technical term is Scoville heat scale – the amount of water drops needed to neutralise the burning sensation – not that the burning will remain neutralised J, you should drink milk for that). I have a rainbow bell pepper seed mix and have to wait forever to see which colour I get (I want a purple one L!).
Blossom end rot, is a deficiency! (not a disease, as some books have led me to believe!) – It is a problem for most plants of the Solanaceae family (tomatoes and eggplants). This is recognised by the sunken and blackening of the tips of the fruits – you cannot save the fruits once this has happened, so chuck them away! OK, what happens is that a calcium deficiency occurs in the soil when it experiences large fluctuations in water content (wet at night to very dry at midday), this causes a water-linked chemical imbalance in the soil and effects the plant. It is not a disease (is not spread by an infectious/contagious organism). So the solution is two-fold, (1) add some calcium to the soil (to restore the imbalance & return calcium to the plant) and (2) make sure the plant's soil has about the same water/moisture content throughout the day – I fill the saucers of my potted tomatoes, eggplant and peppers with water, as potted plants are more susceptible to this than those planted in the garden…
 |
| Blossom End Rot on Tomatoes |
… I was always confused when some books described this being a disease, but it is caused by calcium deficiency, and drought , which also made no sense - but I found a website that explained that water fluctuations (not drought) causes a calcium deficiency and this deficiency causes blossom end rot, which made sense given the chemical link between calcium ions and water regulation in biological systems J. Calcium is also required for normal cellular growth and functioning in plants and their fruits. The ‘disease’ part comes in when the effected area become infected with secondary disease-causing organisms (like fungi and bacteria) – that is why you should remove the fruits that have sunken (and yellowed) fruit tips to prevent the secondary infection from setting in.
The website I found the proper explanation on is a great resource provided by the University of Illinois Extension, Gardener’s Corner - http://urbanext.illinois.edu/gardenerscorner/issue_07/summer_05_11.cfm. They have really great articles there and a huge archive! So go check it out!
Harvesting & Storing
You can harvest your peppers whenever you want, green, yellow, red, unripe and ripe. The fruit should be used immediately, and if you do not use all of the fruit – store it in a plastic bag (vacuumed, if you do not plant on using it soon) with a few drops of water to prevent it from drying out in the fridge – will keep for about 1-2 weeks.
Otherwise you can pickle members of the Capsicum genus in vinegar and add all sorts of other goodies and spices to this. Store them in nice glass bottles makes for cool kitchen decorations as well J.
Seed Saving
Pepper flowers are self-pollinating, do not need pollinators/wind. Different varieties of pepper will cross-pollinate when pollinators are available – to prevent this, pollinate the varieties you want with the same species and then bag the flower.
.JPG) |
| Developing bell pepper flowers Capsicum annuum |
Pepper seeds are easy to store, fully ripe peppers (completely red) seeds are saved. Scrape them out and dry them on a paper towel indoors for about 2 weeks. The dry seeds are stored in glass containers. Seed viability is 2 years. Fresh seeds take longer to germinate (20-50 days) than dried seeds (20 days). Optimum soil temperature is 21-24oC (70-75oF) and seeds should be sown 8 weeks prior to transplanting.
My Bell Peppers
I only have the rainbow seed mix: so I am still waiting to get a purple pepper plant J.
.JPG) |
| What colour would this one be? Bell pepper, Capsicum annuum |
- Update: 09 Feb 2013 -
After some experimentation I have some new information to share:
1) Big pepper fruit + South African Sun = Rotten Pepper Fruits. The South African sun burns holes into the top of the pepper fruits, rain gets into it and the whole thing becomes a soggy smelly mess, but there is a solution! Get some small pepper cultivars from the grocer (or if you can get seeds, even better!) and plant those seeds (remember the red ones have ripe seeds). The small peppers can cope perfectly well with the SA sun and go completely ripe without any sun damage - besides the small peppers are a better size for our family J.
 |
| Small Bell peppers Capsicum annuum |
 |
| Severe Sun burnt pepper Capsicum annuum |
______________________________________________________________________________
Please share with fellow gardening enthusiasts via the various sharing buttons at the end of posts/pages! Else you can vote for posts through the Google reactions bar at the end of articles. To stay up to date I have provided several reader and social networking platforms with which to subscribe: Twitter, Pinterest, RSS Feed Reader or Email/Follow directly using the Blog Followers widget on the left hand side toolbar. Thank you for reading and please feel free to ask if questions arise - I appreciate comments and ideas too! 😆
_________________________________________________________________________________


.JPG)
.JPG)
.JPG)
.JPG)
