Roots 'n' Shoots

Why is RnS Moving to whiskerflowers.wordpress.com?

Google had brought out an algorithm update in May 2017. With previous updates like Panda or Penguin, Mr G had penalized blogs or websites with low quality content and those more focused on aggressive adverts (including multiple ads or pop-up ads in articles). However, many blogs/websites that weren't shady got penalized beyond recovery too and a lot of people lost their income. The May 2017 update has had wide-scale effect on blogs and websites, but without any explanation from Mr G as to why or what it does. RnS has been hit by it too and hard. RnS organic search stats (i.e. users from Google) have dropped by 75% since. Even though RnS is not a source of income, I tried to figure out why RnS is being culled. It seems that it doesn't really have anything to do with RnS per se, but likely because RnS is FREE and not paying for page ranking (via AdWords or Ad Ranking). Now it is likely being aggressively shoved to lower page rankings to accommodate the paid ads.

I cannot rely on Mr G anymore to get RnS' content where it is needed. So I am busy moving RnS to Wordpress where you can find me as Whisker Flowers @ https://whiskerflowers.wordpress.com/

I am also imposing 301 redirects from already moved posts and pages!

- The Shroom - (AKA Whisker Flowers)

Saturday, 30 November 2013

Instant Compost


This is just a quick post for some instant compost ideas.

1. Kitchen waste directly into the soil

Kitchen waste is mainly food scraps: peels, stems and leaves of plant matter. You can add whole pieces of kitchen waste to the soil (it will take 2-3 months to break down depending on the season). Or you can process the kitchen waste in the blender before adding it to the soil. Water the hole after filling it up again. The nutrients are directly accessed by plant roots and seeds can be if you sown on top of the hole (30cm), which contains the kitchen waste.


2.  Check your gutters

Gutters get clogged with leaves and twigs, with constant rain and wet conditions, have already decomposed and is ready to use in the garden. Again add directly to the garden, either as a nutrient rich mulch/mould, or bury as compost.

3. Manure tea

Mature animal manure (no longer smelly) is added to a fabric bag and suspended in water, at a ratio of 1:3 (this is 1/3 manure to 2/3 water). The concoction is left for 3-7 days to steep. The resulting mixture is diluted to 1:5 for garden plants (1 litre of tea added to an extra 5 litres of clean water) or 1:10 for container plants (1 litre tea to 10 litres water). The solution is used as a liquid or foliar feed.


4. Coffee & tea compost

Another quick compost recipe is to add spent coffee ground or tea leaves to the soil – this is super stuff, especially as they have lots of nutrients, are water retentive and they are pre-processed into a fine matter. It can also be used as a seedling potting medium.


5. Nettle & comfrey tea

Nettles and comfrey can be turned into a smelly liquid feed in the same way as manure tea. First get some nettle leaves (young nettle leaves, the top parts of the plant) or comfrey leaves. These are placed in a hessian or other porous bag (old pillow case) and is placed in a bucket of water. For each 1kg of leaves add 20L of water. The concoction is left for 20-30 days until smelly. You can place a lid on top to keep the smell at bay (and likely the flies). The liquid feed is diluted 1:10 [1 litre of tea is added to 10 litres of water]. This can be used as a liquid or foliar feed.


6. Worm tea

Worm tea can be made by flushing your worm farm with fresh water. The solution is used in a 1:1 ratio (1 litre tea added to 1 litre water) as liquid or foliar feed. My wormery is moist and drips its own liquid through without me having to flush it - I collect the run-off once a month.


Any extra suggestions?


______________________________________________________________________________

Please share with fellow gardening enthusiasts via the various sharing buttons at the end of posts/pages! Else you can vote for posts through the Google reactions bar at the end of articles. To stay up to date I have provided several reader and social networking platforms with which to subscribe: TwitterPinterestRSS Feed Reader or Email/Follow directly using the Blog Followers widget on the left hand side toolbar. Thank you for reading and please feel free to ask if questions arise - I appreciate comments and ideas too! ðŸ˜†
_________________________________________________________________________________

Saturday, 23 November 2013

Raspberry: How to Grow – Fruit of the Month

Raspberry stats/requirements at a glance

Ease of Raising:
2/5
Weekly Check-ups (fruiting & ripening)
Water:
4/5
Daily (they don’t mind ‘wet feet’ in pots)
Sun:
4/5
Full sun, shade tolerant (morning sun preferable)
Training:
5/5
Absolutely, require stakes and pruning of already fruited stems
Fertilise/Feeding:
3-4/5
Moderate (monthly when growing) to fortnightly (fruiting)
Time to Harvest:
3/5
Moderate, 2-3 Months
Frost Hardiness:
3/4
Very hardy, can’t cope with black frost. Frost hardiness linked to dormancy.


Uses
Culinary, pollinator attractor (wasps)

Most Problematic Nemesis:
Diseases carried by leafhoppers/aphids

Container Plant:
Do well in large pots


Rubus idaeus
Flora of Germany, Austria and Switzerland
1885
Kurt Stubers Online Library

Quick intro

Cane and bush fruiting plants aren’t very popular in your average garden, but are a valuable addition as they second strawberries in term of their prolific fruit production (the amount of fruit per m2 of soil occupied). I have had more success with my cane fruits that strawberries and I find them a lot easier to grow. They produce a lot of berries at once and many fruit two times a year (once in summer and again in autumn). They take up minimal space due to their upright nature, which also complements their growth in large pots, and are pruned to maximise fruit production.


History

The origin of raspberries is somewhat confounding and several historians have different theories. Raspberries have been cultivated for 500 years in Europe and western Asia from their wild counterparts and they have been planted in England gardens since the 16th century. Discovery of seeds at archaeological sites suggest that raspberry fruits have been collected for consumption and perhaps medicinal use by pre-historical man during the Neolithic period.

Wild raspberries from North America are classified as a different species. Both the red and black wild raspberries were used and domesticated by early settlers.

Presently there are three major commercial producers of raspberry; (1) the former USSR, (2) Europe, specifically Russia, Poland, Serberia, Germany, Scotland and Spain; (3) and the Pacific Coast region of North America. Some production is also done in New Zealand, Chile and South Africa.


Science Stuff

The common raspberry is, Rubus idaeus and belongs to the Rosaceae family (the rose family! You can see the resemblance by looking at the ‘inner’ flower formation). Rubus idaeus fruit can be red or yellow (the later known historically as the white raspberry).


Wild raspberries
Red, black , purple and white
Rubus species

The wild red raspberry from North America is, Rubus strigosus and the black is, Rubus occidentalis. These two species have also been hybridised to produce the purple raspberry.


Growing Raspberry

Dormant, disease-free, year-old raspberry canes are planted during winter. Bare-rooted canes are soaked in liquid fertiliser about 30 minutes before planting to assist them with the transplant. They can be planted as part of a berry soft-fruit garden directly in the soil and trained against a wire system. There are several training systems for raspberries. Individual plant spacing and amount of canes tied in will depend on the training system used and the vigour of the cultivar.

Raspberries at various stages of development.
Dark gummy raspberry is ready for eating.

Raspberries have two varieties or fruiting patterns;
1)                  Summer-bearing: Fruit forms on two year old canes (previous season’s growth)
2)                  Autumn/Fall-bearing: Fruit forms on one year old canes
3)                  Both: Some varieties are able to produce fruits twice a year, once in summer and another lighter crop in autumn.

The general rule is that once a cane has fruited it is removed by cutting it down to the soil level. Canes that have fruited will also die-back. Suckers will emerge and will supply new fruit. Strong suckers are chosen and tied down whereas any additional or spindly suckers are removed.

Generally horizontal wires are constructed between sturdy posts at a height of about 1.5 m. Canes are tied to the horizontal wires with thick twine to minimise damage to the canes


English Hedgerow System

Year One, Winter: Nursery stocks are planted and the existing canes are cut back to 60cm and tied in.

Year One, Summer: Suckers that emerge between raspberry plants are thinned and the strongest tied in.

Year Two, Winter: For summer-bearing, old stems are cut down to ground level and the tips of the new canes are pulled over the wire and tied in. For autumn-bearing, cut all canes to ground level, new ones will develop next season and their tips are pulled over the wire and tied in as with summer-bearing.

The information on pruning of raspberries and other berries are provided in the 'Best Soft Fruit' by Stefan Buczacki and 'The Ultimate Practical Guide to Pruning and Training' by Richard Bird, and both books' information is provided in my Reviews page. 

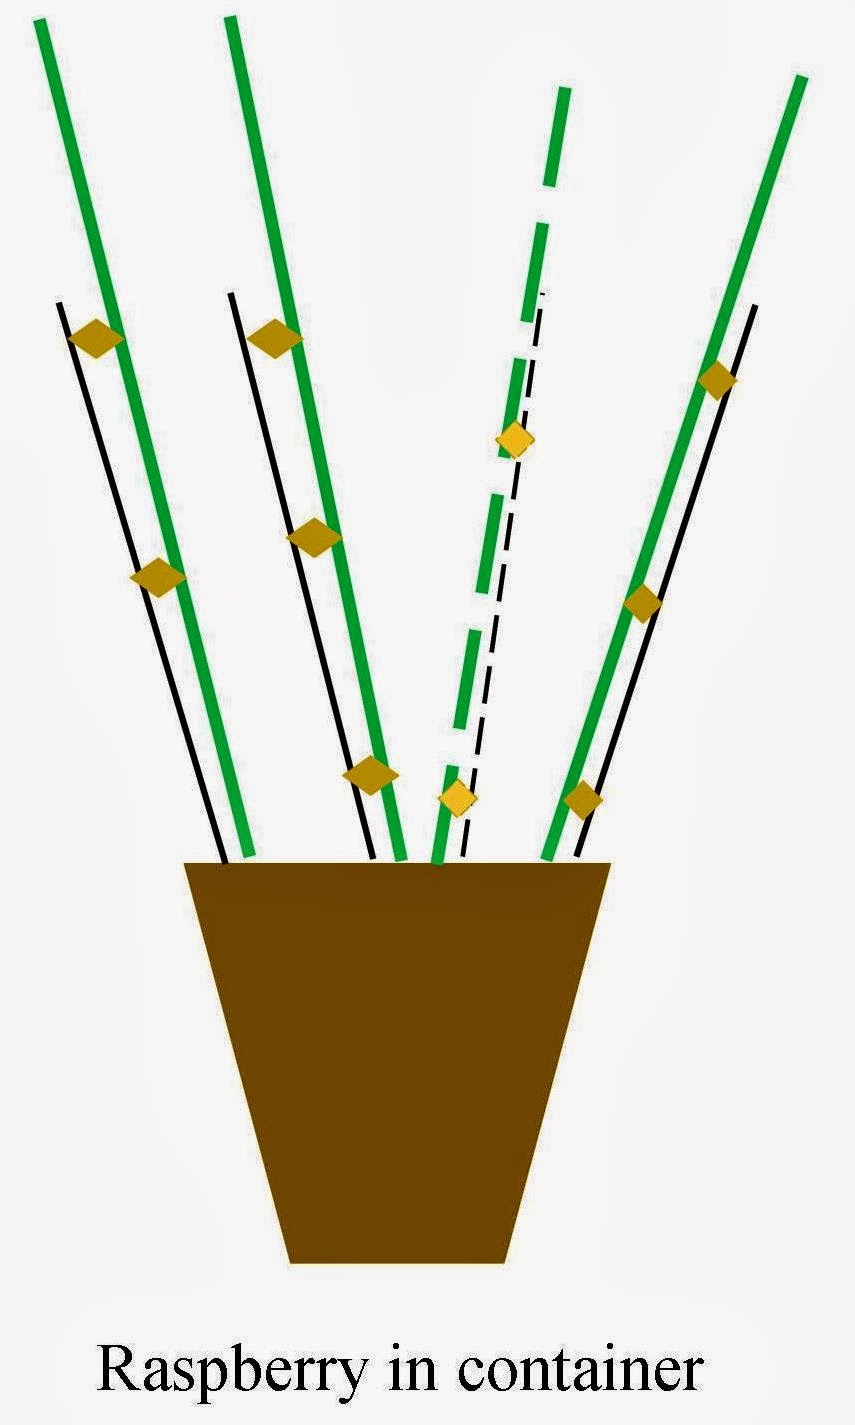
Alternatively (I didn’t originally plan my garden to accommodate raspberries in the plot), pots can be a space-saving consideration. Several stakes are secured towards the outside of the canes and the stems are tied to those. Depending on the size of the pot you can allow several canes to develop (in my 30 cm pot, I only allow six canes at one time). Each cane can carry 2-5 clusters with 15-20 raspberries, which quickly adds up (on average, 3 plants x 3 clusters x 17 raspberries = 153 raspberries!).


Raspberries are a long-term investment and can produce fruits for 6-10 years. When raspberry production decreases old plants are removed and destroyed (not composted due to disease). New plants are planted on a fresh site to prevent new stock succumbing to any disease in the old site.


Other Raspberry Tips

All gardening books make specific reference to raspberry susceptibility to various plant viruses. Personally I have not had any virus infections thus far. The most prominent of viruses are:

1)                  Raspberry yellownet virus
2)                  Raspberry leaf spot virus
3)                  Raspberry leaf curl virus
4)                  Raspberry mosaic virus

All of their symptoms are nondescript; yellowing of leaves, margins or spot formation and stunted growth. The best remedy for this is to by virus-resistant cultivars, since viruses are internal and very difficult to treat or to eradicate. Another reason for planting your new raspberry stocks away from the old site to prevent disease built-up. Also keep the viral vectors at bay. Vectors are generally insect carriers that transmit viruses between host plants. Aphids transmit all types of mosaic viruses (and not only to raspberries, but to your other plants as well), whereas soil-living nematodes can transmit Arabis mosaic virus. On the other hand, leafhoppers transmit a plant bacterium, known as phytoplasma to raspberries, which causes the disease Rubus stunt. These pests (disease vectors) can be controlled by organic means, please refer to my Pest Control page.

As with most fruiting canes and bushes, raspberries prefer acidic soil, but will tolerate soil on the neutral range.

Raspberry flower buds
Rubus idaeus

Suckers can be problematic if the come up away from the raspberry bed and need to be removed. To minimise unwanted suckers bury heavy gauge plastic sheeting in the bed at a depth of 75cm.

Raspberries have very spiny stems that can cause dermatitis (skin irritation or rash). So wear gloves when pruning the plants or harvesting berries that might be within the thorny mess.

Birds can become a problem as they are attracted to the red colour and the especially like shiny red ripe fruits. Netting can be constructed over the raspberries to keep the birds at bay or simply chase them away with my simple DIY CD bird deterrent.


Harvesting & Storing

Raspberries flowers are pollinated by insects, especially wasps like to visit them. After pollination the aggregate fruit develops. Raspberries are a breeze to harvest. The trick is to harvest them when they are fully ripe (deep gummy translucent colour). If the raspberries are fully ripe, they will easily separate from their receptacle when pulled.

Raspberry receptacle after fruit removal
Rubus idaeus


A few plants are needed, about 3-5, to get a large bowl of raspberries – which in my opinion takes up less space than enough plants for a bowl of strawberries.

Raspberries will stay good in the fridge for about 3 days, else they can be frozen. Frozen raspberries will go sour if not prepared properly before storage. Also freezing breaks down the fruit cells and berries are squishy as a result when thawed, but all the flavour will remain. Only perfect raspberries are chosen for freezer storage by laying them out on a baking tray and sprinkling them with a thick layer of caster sugar. These are placed into the freezer as open-trays and when the fruit is frozen they are paced into bags.

Non-perfect fruits (overripe or blemished) can be made into jams, syrups and purées that can also be frozen for long term storage.


Propagation

Remember those pesky suckers? They can be dug out, lifted and replanted in a new site to give rise to another plant. Large raspberry plants can also be divided and replanted.

Raspberry suckers
Rubus idaeus

Raspberries can also be propagated by taking softwood or semi-ripe cuttings.


My Raspberries

I have three red raspberries that fruit two times a year. Again, I have no idea the exact cultivar name, but I am thoroughly enjoying their berries and no-nonsense upkeep. For raspberry suppliers in Roodepoort (West Rand), see my Nurseries & Suppliers page.


Red raspberry
Rubus idaeus


______________________________________________________________________________

Please share with fellow gardening enthusiasts via the various sharing buttons at the end of posts/pages! Else you can vote for posts through the Google reactions bar at the end of articles. To stay up to date I have provided several reader and social networking platforms with which to subscribe: TwitterPinterestRSS Feed Reader or Email/Follow directly using the Blog Followers widget on the left hand side toolbar. Thank you for reading and please feel free to ask if questions arise - I appreciate comments and ideas too! ðŸ˜†
_________________________________________________________________________________

Saturday, 16 November 2013

House Wasp: DIY Beneficial Insect Homes

When we moved the garden outside at the back of the kitchen, I had made a couple of insects’ homes. I tried different types of designs I found on the internet. Most of them went un-inhabited, except for two:

Commercial Bug House

Exhibition A: The Log Pile

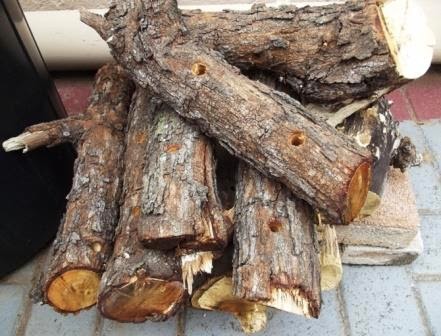
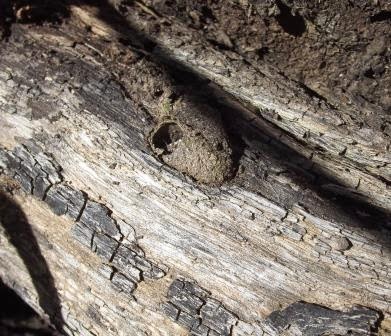
The log pile was meant for carpenter and mason bees, but I mostly saw very large ants staying in the holes drilled into the logs. There were some centipedes and earthworms at the bottom of the pile. I did find some mud houses that may have belonged to the mason bees, but I cannot be sure. At least the log pile does bring in some garden helpers.

The Log Pile

Insect mud house


Exhibition B: House Wasp

I read about bumble bees being very efficient pollinators – more than your usual honey bee. This design was meant to attract and house them close to my garden. For two years it remained vacant, but during the summer months of 2013 (Jan-Mar), some of the smaller paper wasps have taken up residence.

Someone, who shall not be mentioned, moved the box and placed the entrance against the wall – I moved the box back and found that my previous carton roll entrance had been eaten by the rain. I fixed this with a new toilet paper roll wrapped in plastic – but for this I had to lift the lid… and was surprised to find a humongous paper wasp nest – a good two tennis ball sizes! I quickly repaired the box and left the now-angry wasp alone. I put up some warning signs; should unmentionable persons want to move it again.

House Wasp

Paper wasps are great predators to have around the garden, rounding up caterpillars to feed to their young. The adults like to pollinate aggregate fruit flowers (such as raspberries, blue berries and strawberries) and they also like to visit the marjoram flowers.

Seeing as this insect house was successful, I thought to make another and share the design with you:

Job requirements:

1 Person & less than 30 minutes

Equipment:
Polystyrene ice box (get @ plastic shop)
Scissors
Screw driver
Piece of frost fleece or old sieve curtain
Twine
14 tooth picks
6 screws
Packet of wood shavings
Tape
Piece of plastic/small plastic bag
Toilet roll carton


Supplies

  1. Cut a hole into the front of the polystyrene ice box to fit in the toilet roll carton.
  2. Wrap the toilet roll carton in the plastic bag with a little plastic overhang on the outside to ward off rain.
  3. Stuff the toilet roll carton into the front hole.
  4. Fill the box with wood/pet shavings. 
  5. Cut the frost fleece to size and secure with the screws (Do not tighten too much – else you’ll strip the polystyrene!). 

  6. Stick the toothpicks about half-way into the polystyrene around the top of the fleece.
  7. Put the lid on and pin into the toothpicks – leave a little bit of room at the lid for some airflow. 
  8. Tie off with twine to prevent the lid from coming off during heavy winds. 
  9. Cut a V into the bottom of the plastic overhang to prevent the plastic from warping and blocking the entrance. 
  10. Place in a shady, rain-protected spot, such as under a table/tree.
  11. The box can be placed on some bricks in case of flooding.
  12. (Optional) Secure a water and fade-proof warning sign onto the box.
  13. Wait one-two seasons for inhabitants.


You will likely forget about the house, as I did, and be delighted to see the inhabitants buzzing in and out on garden duty. I am also looking into establishing as insectary in my garden and will have a full post on that next month!
  
Paper wasp nest
Polistes fastidiotus


Have you tried insect homes? Do you have a winning design?

______________________________________________________________________________

Please share with fellow gardening enthusiasts via the various sharing buttons at the end of posts/pages! Else you can vote for posts through the Google reactions bar at the end of articles. To stay up to date I have provided several reader and social networking platforms with which to subscribe: TwitterPinterestRSS Feed Reader or Email/Follow directly using the Blog Followers widget on the left hand side toolbar. Thank you for reading and please feel free to ask if questions arise - I appreciate comments and ideas too! ðŸ˜†
_________________________________________________________________________________

Saturday, 2 November 2013

Lunar Gardening - Planting by the phases of the moon


[New Follow-Up Post, 08 November 2014Lunar Gardening Revisited & Biodynamics]


I have always been curious about the topic of Lunar Gardening. After watching a TV show where they compared two vegetable plots. Both had the same growing conditions and the only difference being one was planted according to the moon phase and the other whenever they felt like it. Amazingly the moon planted one looked like the amazon rainforest in comparison to the other. I decided to try it this growing season and did some research.

Lunar gardening is based on the gravity effects of the moon on the Earth. All objects in the universe have gravity, not just planets, but animals/plants have gravitational effects on one another too! The impact of this gravity depends on size and proximity, thus because we (humans) are stuck to the earth, which is far greater than our bodies. Also the gravitational pull between two people becomes so small (relative to the Earth) that it has no affect at all. This applies to the relationship of the Earth, the sun and the moon. The Sun is very large, keeping the solar system and all its planets in check. The moon exerts a gravitational pull on the Earth; where the Earth is larger and keeps the moon in orbit, whereas the moon pulls on the large water bodies of the Earth. This creates bulges of the ocean at opposite ends of the Earth, depending on the position of the moon, also known as the tidal forces. This causes the elevation or reduction of the ocean levels and causes ocean tides. The same can be applied to unseen water bodies of the earth, such as the water table below the ground and soil moisture. This creates a lunar water cycle in the soil, where more or less soil water is available to growing plants – and in turn affects their growth.

Phew! Hold on a little longer, some more physics to come! Now then, the moon has different phases during the month. This is due to the locked orbit of the moon. The moon rotates around its own axis once it completes an orbit around the Earth – this means the moon is in a sidereal revolution or synchronous orbit to the Earth – and has the same side facing the Earth at all times. Trying to visualise this just makes my head spin… Anyways, the moon goes through phases as it orbits the Earth, depending on how much sunlight it receives. The moon takes 27 days, 7 hours and 43 minutes to orbit the Earth and equates approximately to an Earth month.

What does all of this mean for growing plants? Lunar light and gravity will determine certain gardening jobs throughout the month.  

Refer to numbered headings below

1. New Moon to 2nd Quarter

Balanced root and leaf growth due to this phase having the strongest gravitational pull & increasing light.

Sow: Above ground growing crops with ‘outside seeds’
Plant: Annuals (leafy veg, cabbage, broccoli, cauliflower, celery & grains), parsley & most herbs, and cucumbers (the exception to outside seeds).
Jobs: Fertilise, graft & prune to promote leaf growth


2. 2nd Quarter to Full Moon

This phase promotes leaf growth, since the moonlight increases and the gravitational pull decreases.

Sow: Above ground growing crops with ‘inside seeds’, preferably two days before the full moon.
Plant: Flowers, annuals on vines (squash, pumpkins) and Solanaceae family (capsicums, tomatoes, eggplant), legumes (peas, beans)
Jobs: Prune to promote leaf growth


3. Full Moon to 3rd Quarter

Moonlight is decreasing and the moon has a high gravitational pull.

Sow: Below ground growing; root and bulb crops. Shrubs, trees, biennials and perennials
Plant: Root veg (carrots, beet, potato, sweet potato) and bulbs (onions, garlic)
Jobs: Transplanting and prune to reduce leaf growth (to shape plants)


4. 3rd Quarter to New Moon

Moonlight and gravitational pull are low, no planting is done, but all the other gardening jobs can be done during this resting time.

Jobs: Harvesting, weeding, pest control, removal of plants, turn the soil, start composting piles and prune to reduce leaf growth (to shape plants).


NOTE: No planting on the day the moon is “in phase” – thus no planting on the day of the full moon, new moon or quarters.

Now most of it makes sense, except the harvesting part – so you are going to go hungry or let ripe fruit go to waste for most of the month!!! So maybe we just then harvest when we need to rather J, unless I am missing something.

You can also combine the moon phases with the Zodiac and elements, but then it becomes all too complicated if you ask me…

I think it is fine to try lunar gardening when you really have the time. But I feel that the garden should fit around your schedule and not rule your life. I tried for about two months and gave up because I can only garden when I have time (which usually does not align with the moon) and lunar-gardening then just takes over your life! Since I only followed the lunar gardening for a short while I cannot definitively say that it made a difference (likely only in the long run). If any of you can hold out for longer than I did - I would love to hear about your plant results (and some pictures too!) J.

Anyways, here is a table for the Moon Phases in South Africa for 2013, 2014, 2015, 2016  and 2017.

2013

2014

2015


2016

2017


The dates and times for the phases will differ depending on where in the world you are. I got this specifically for SA; you can generate a similar one for your area at www.timeanddate.com . They have all kinds of other cool features there as well. Else you can get a lunar planting calendar from many websites. If you want a more detailed calendar for SA: The Gardener Magazine has a lunar planting guide in their current issue each month.


- Update 22 March 2014 - 

For those of you interested in planting by the moon and the Zodiac, here is a link on how to do that: Moon gardening.


- Update 08 November 2014 - 


I have done a follow-up post on this which includes new information and a Biodynamic Calendar suitable for all countries and available world-wide to purchase based on the lunar sidereal cycle as well as its associated constellations. I have also posted on a South African based Moon Calendar as well!

Lunar Gardening Revisited & Biodynamics


______________________________________________________________________________

Please share with fellow gardening enthusiasts via the various sharing buttons at the end of posts/pages! Else you can vote for posts through the Google reactions bar at the end of articles. To stay up to date I have provided several reader and social networking platforms with which to subscribe: TwitterPinterestRSS Feed Reader or Email/Follow directly using the Blog Followers widget on the left hand side toolbar. Thank you for reading and please feel free to ask if questions arise - I appreciate comments and ideas too! ðŸ˜†
_________________________________________________________________________________

Saturday, 19 October 2013

Eggplant Rust – Disease of the Month

Eggplant Rust at a glance

Type of Damage
Stunted growth, leaf blight
Plant Symptoms
Bright orange blisters under leaves
Favourite Plant
Common & African eggplant
Control
Difficult (Sulphur based products)

 
Eggplant Rust
Puccinia substriata
Pearl Millet Rust

Quick Intro

This is a recently identified rust problem on eggplants. Pearl Millet Rust (Puccinia substriata var. substriata), the same fungus that infects Pearl Millet (Pennisetum glaucum), has been recorded infecting eggplant (since 2006). Here I provide you with a complete profile on what is currently known about this disease.

Science Stuff

The family Pucciniaceae contains several pest fungi of grain crops, which belong to the Poaceae family (the grass family). The Puccinia genus contains a very large number of species and 'variants'. 'Variant' being a rust of the same species but might differ in spore morphology or ecology. I will be discussing Puccinia substriata var substriata, Puccinia substriata var penicillariae and Puccinia substriata var indica.

Hosts

Puccinia substriata var substriata infects the ‘common’ eggplant (Solanum melongena) and its horticultural rootstock, the turkey berry (Solanum torvum). This species was often confused with Aecidium tubulosum, but has now been confirmed to be the same species through inoculation experiments (Ref 1).

Puccinia substriata var penicillariae infects the ‘common’ eggplant from Brazil. Again confusion resulted in the same fungus been given two species names. Therefore, Puccinia substriata var indica is the same species as Puccinia substriata var penicillariae. No symptoms of Puccinia substriata var penicillariae infection was noticed on Solanum americanum (American nightshade), Solanum sisymbriifolium (Sticky Nightshade), Solanum tubersonum (Potato) or Solanum paniculatum (Jurubeba, a nightshade) after inoculation and therefore these species of Solanum are not considered host plants (Ref 2).


Puccinia substriata var substriata and Puccinia substriata var penicillariae infect the same host plants and have similar life cycles, they only differ by geographical dispersal. Puccinia substriata species occur in Africa, North America, Central America, USA, Mexico, Caribbean and South America (Ref 2 & 3).

Aecidium cantanese (potato deforming rust) is another similar rust species that has been recorded on the African eggplant (Solanum macrocarpon) in Benin during 2011 (Ref 4).

It has also been shown that the Puccinia grass-infecting (or Poaceae-infecting) rusts are evolutionarily distinct from the Puccinia hardwood-infecting (or Junaceae & Cyperaceae-infecting) rusts (Ref 5 & 6).


Life Cycle (Ref 2)

Rusts are ‘simple’ fungi with very complicated life cycles. They can reproduce asexually (without a compatible partner) and sexually (with the fusion of gametes). The mechanism of reproduction, their morphology and cytological structures define their growth/life stages. Typically rusts have five distinct life stages, but I am just going to discuss three.

Eggplant Rust
Topside of leaf
Puccinia substriata
Eggplant rust
Underside of leaf
Puccinia substriata


Pearl millet rusts are heteroecious, meaning they require two host species to complete their life cycle.
The initial host, AKA alternate host, is infected early in the growing season, usually during spring. This will be the eggplant (Solanaceae) host. During this stage mature teliospores from the previous seasons’ rust growth infects the eggplant leaves. These germinate and grow on the eggplant host, in what is known as the Aecial stage (asexual). Aecia are cup shaped and grow into the leaf tissue. They cause local necrosis (cell death) and stunt the host plant. As they mature they will burst open and release aeciospores.
Aecioposres disperse with the wind and fall upon the next host, AKA definitive host, such as Pearl Millet where sexual reproduction takes place. Aeciospores germinate and grow as Uredinia. The Uredinial stage remains asexual and bolsters the rust population by infecting new pearl millet hosts with Urediniospores. Towards the end of the growing season, in late summer, Uredinia mature and become Telia. Telia cause the most damage to the host plant. Necrotic lesions increase in size, connect and coalesce. At this stage the rust causes large scale necrosis and leaf blight (dropping of dead leaves). Telia also burst open to disperse teliospores. Teliospores are thick, black structures that are able to overwinter and are almost impossible to kill. Teliospores will then infect the alternate host come spring.

Pearl Millet rust life cycle
Start at 'Initial innoculation' at the top left-hand side


The rust infection is more abundant, grows more aggressively and inflicts more damage to crops at each stage its life cycle, from the alternate host towards the definitive host. Therefore effective control is applied during the correct stage of the life cycle and when both the alternate and definitive hosts are treated. All stages are similar in terms of their growth, eruption of mature structures and the release of wind dispersed spores.

Control

Rusts are hard to control and several chemical treatments exist. Sulphur containing fungicides prevent spore germination and stunts the growth of the rust. I have developed an organic treatment of eggplant rust using lavender, rosemary and sulphur. Check out my Pest Control: Eggplant Rust section for the recipe and an in-depth explanation as to why it works.

Dead eggplant rust (red arrows)
Re-infection and the amount of spores that survive to the next season is reduced by controlling the fungus early in the season when symptoms are noticed (spring). You will never be able to eradicate rusts completely from an area as other hosts plants may distribute wind blown spores into your garden from a distance and spores will always be present in the soil. This control is for seasonal use to decrease the total damage caused to your crops and food production.

Preventative Tips

ü    Avoid overwatering of plants
ü    Avoid wetting leaves
ü    Decrease crop planting density
ü    Increase air circulation between plants
ü    Rotate crops

Something Interesting: Saint Anthony’s Fire

Claviceps purpurea
Köhler's Medizinal-Pflanzen in naturgetreuen
Abbildungen mit kurz erläuterndem Texte
1887
Kurt Stuber's online library

Rusts are related to another crop pest known as the Smuts, such as Claviceps purpurea.
Claviceps purpurea is an ergot fungus that grows on rye and other cereals. The fungus infects the ears of rye and produces a black growth filled with toxic alkaloids. When you eat grains infected with ergot fungus you become intoxicated with the alkaloids and will suffer neurological symptoms. During the Middle Ages and medieval times people suffering from ergotism believed themselves to be on fire; they will strip, run down the walkways, yelling as they ran and other people would merely think them bewitched. The monks belonging to the Order of St. Anthony were very adept at treating the poisoning and soon people identified the source. Thus, the disease caused by ergot fungi became known as Saint Anthony's Fire.


References

Ref 2: De O. de Carvalho, A. et al (2006) Description of the life-cycle of the pearl millet rust fungus– Puccinia substriata var. penicillariae with a proposal of reducing var. indica to a synonym. Mycopathologia 161: 331-336
Ref 6: Maier, W. et al (2007) Polyphyly and two emerging lineages in the rust genera Puccinia and Uromyces. Mycol Research 111(2): 176-185


Last Comments

It seems that the Puccinia species are increasing in their geographical spread and that their distribution is no longer restricted to Africa and the Western Hemisphere, but they have now been recorded in Europe as well (Ref 3).

Please note that any herbs or vegetable crops that are grass-species (Poaceae family) can become infected with rusts and their control will be similar to that of eggplant (sulphur-based treatments). Rust infection can occur on lemongrass and any cereal crop (maize, rye, barley, rice...).

 
Teleospores of Wheat Rust
Puccinia graminis


Have you noticed eggplant rust on your plants?

______________________________________________________________________________

Please share with fellow gardening enthusiasts via the various sharing buttons at the end of posts/pages! Else you can vote for posts through the Google reactions bar at the end of articles. To stay up to date I have provided several reader and social networking platforms with which to subscribe: TwitterPinterestRSS Feed Reader or Email/Follow directly using the Blog Followers widget on the left hand side toolbar. Thank you for reading and please feel free to ask if questions arise - I appreciate comments and ideas too! ðŸ˜†
_________________________________________________________________________________

Absolutely Gorgeous Beautique

Absolutely Gorgeous Beautique
Your beauty, weight loss, slimming and skin care salon of choice! Products with International Shipping!